

How to Plan a Travel Itinerary Step by Step
A good travel plan starts with three decisions made in order: where and when you are going, how much you will spend, and which sights belong together on the same day. Everything else, from bookings to packing, follows from those choices. This guide walks through the process in ten steps, built for independent travelers who want a dependable itinerary for a once-in-a-lifetime trip without spending dozens of hours on research.
What You Need Before You Start
Gather a few basics first so each step goes faster.
- A rough date window. Even two or three possible weeks are enough to begin.
- A budget range. A total figure you are comfortable spending, plus a number you hope to land closer to.
- A shared document or notes app. One place for confirmations, addresses, and opening hours.
- A map tool. Any digital map that lets you save places and view distances.
- A list of your non-negotiables. The two or three experiences that make the trip worth taking.
That is the entire kit. Once you have it, the process below takes a few focused evenings rather than weeks of scattered browsing.
Step 1: Define the Purpose of the Trip
Start by writing down what this trip is for, because the answer shapes every later decision. A traveler who wants cathedral towns and slow lunches needs a different itinerary than one who wants coastal hikes and late nights in a capital city.
Write three to five sentences covering the pace you want, the kind of experiences you value, and anything you refuse to give up. For a once-in-a-lifetime trip to a single country, this short statement works as a filter. When a friend suggests a seven-hour detour, you can check it against your own words and decide in seconds.
Step 2: Choose the Destination and Dates
Pick the dates by weighing weather, crowds, and cost together, then confirm that the sights you care about are open in that season. Shoulder seasons often give the best balance: fewer crowds, milder temperatures, and lower prices on lodging.
Check these items before you commit to a window:
- Seasonal closures of attractions, ferries, or mountain passes
- Public holidays and local festivals that can raise prices or close shops
- Daylight hours, which affect how much you can fit into a day
- School vacation periods in the country, which fill popular spots
If your trip targets a specific country, a dedicated guide can shorten this step considerably. The Awesome Guide to Portugal, for example, is one of many country guides built from more than 200 hours of research, so seasonal and regional details are already filtered for you.
Step 3: Set Your Budget by Category
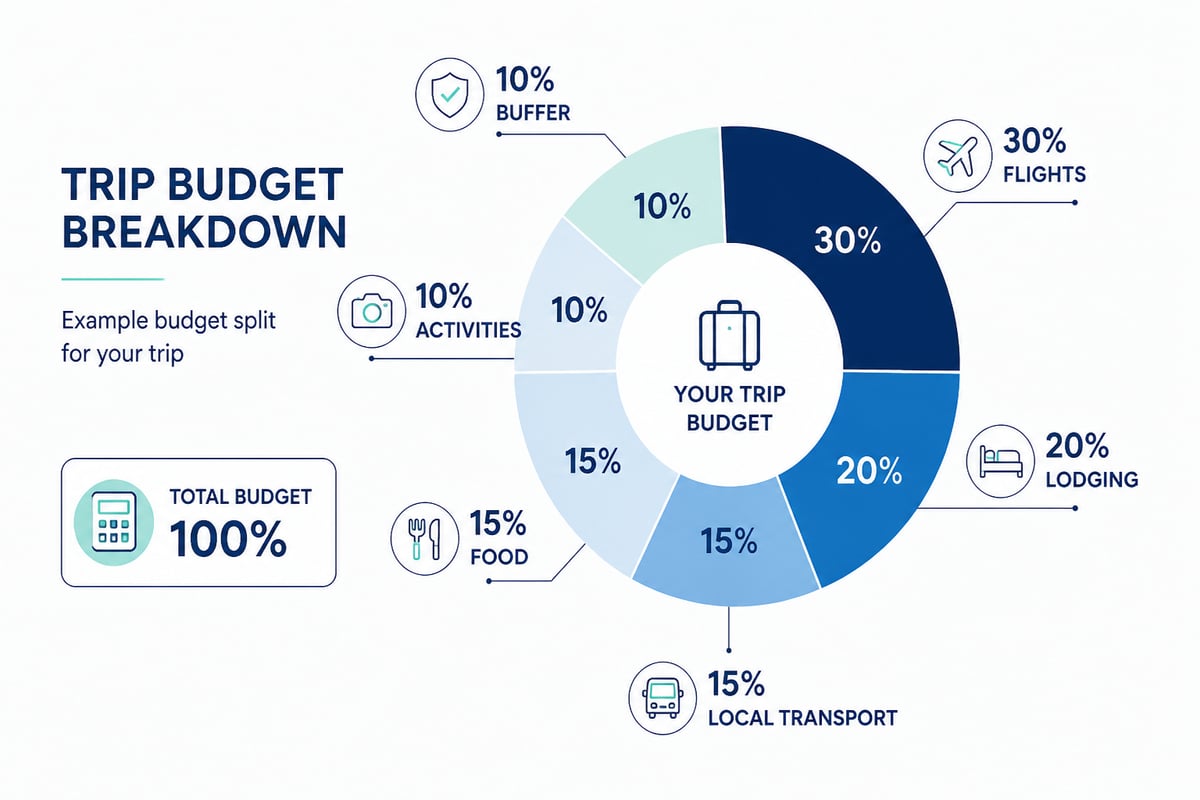
Divide your total budget into categories before you book anything, because a single lump sum hides where money actually goes. A workable split covers flights, lodging, local transport, food, activities, and a buffer of roughly ten percent for surprises.
Decide which categories you will spend generously on and which you will economize. Many travelers pay more for a well-located room and save on meals by mixing restaurant dinners with market lunches. Our walkthrough on planning a budget-friendly adventure with digital travel guides shows how to set those priorities without sacrificing the experiences you came for.
Record the budget in your shared document and update it as bookings are confirmed. Seeing the remaining balance after each purchase keeps decisions honest.
Step 4: Pick a Base and Decide How Many Stops to Make
Choose a small number of bases, because every change of location costs roughly half a day in packing, transit, and settling in. A general rule is to stay at least two nights in each place, and three or more in cities with many sights.
Count your available days, subtract arrival and departure days, then divide what remains among your stops. A ten-day trip comfortably supports three bases; four or five starts to feel like a transit schedule rather than a vacation. Our article on planning a Portugal trip that doesn't feel rushed or overstuffed applies this logic to a real country and is useful for any destination.
Consider using one base for day trips. Staying in a single hotel and returning each evening removes repeated check-ins and lets you adapt to the weather.
Step 5: List Everything You Want to See, Then Cluster It
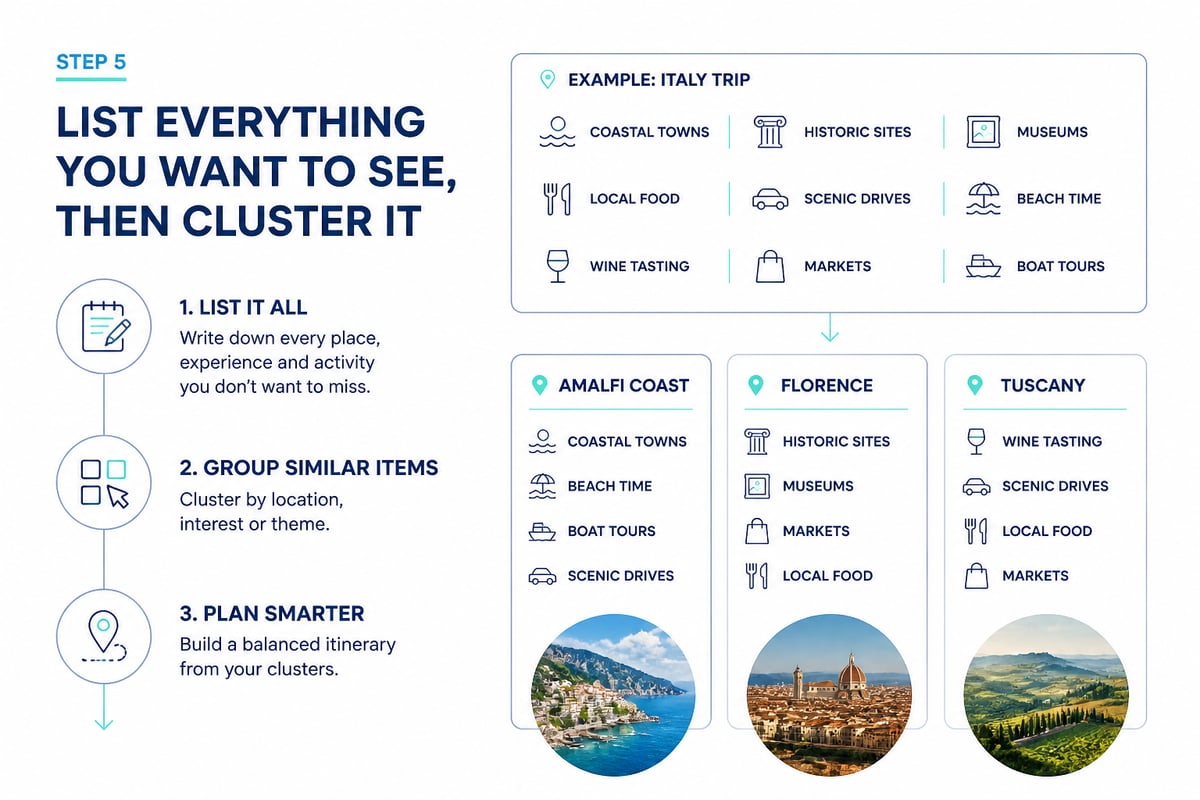
Brainstorm freely, then group each item by neighborhood or area on a map. This is the step that turns a wish list into a workable travel plan, because geography decides what fits into a day.
- Save every candidate sight, restaurant, and viewpoint to a digital map as a pin.
- Look for natural clusters, such as an old town, a waterfront, or a hillside district.
- Mark the places that need advance tickets or have fixed hours.
- Rank each pin as a must-do, a would-like, or a bonus.
- Remove or postpone pins that sit far from every cluster.
Clustering prevents the most common itinerary flaw: zigzagging across a city and spending your day on trains. A curated source helps here too. Our guides are independent, so the hidden gems you find reflect research rather than sponsorship.
Step 6: Build the Day-by-Day Schedule
Assign each cluster to a day, anchoring the schedule around fixed-time items first and filling flexible items around them. Place the experiences with timed entry or limited availability on specific days, then arrange the rest by proximity.
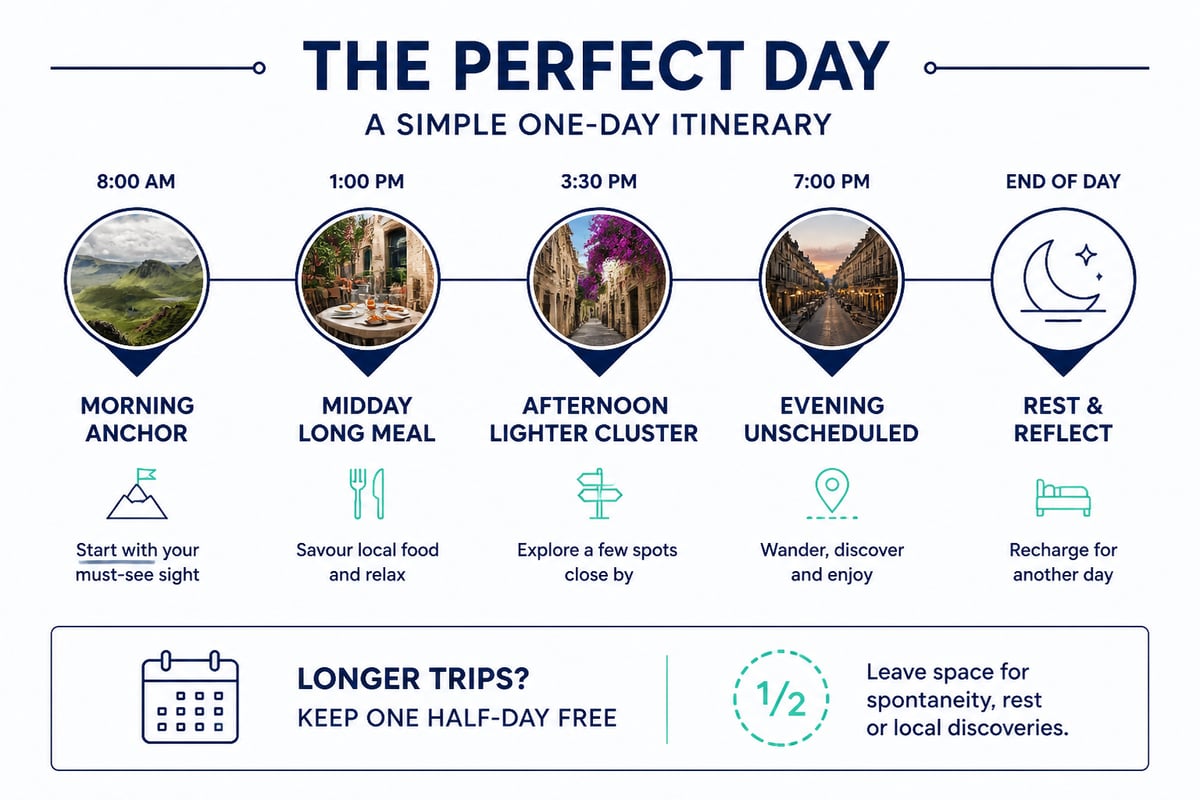
A reliable daily template looks like this:
- Morning: your most demanding or popular sight, when crowds are thinner and energy is highest
- Midday: a long meal or a slower activity, such as a market or a park
- Afternoon: a second, lighter cluster of stops
- Evening: dinner and an unscheduled walk
Limit each day to one major sight and two or three minor ones. Leave at least one half-day entirely open on a trip of a week or longer, since this is where spontaneous finds and rest happen. If your trip includes a specialized activity, such as a private photography tour in Iceland led by a local photographer, schedule it early in the trip so weather delays can be absorbed by later open days.
Step 7: Plan Transport Between and Within Stops
Decide how you will move between bases and around each one, then book the long-distance legs that sell out or rise in price. Trains, domestic flights, and ferries on popular routes often cost more as the date approaches, while local buses and metros can be handled on arrival.
Compare options on door-to-door time rather than the headline duration. A fast train that leaves from an inconvenient station may lose to a slower one that drops you beside your hotel.
Prepare for patchy connections. Google Maps lets you download an area for offline use, and driving directions work when the full route sits within the downloaded map, though offline mode does not provide traffic information or alternate routes. Download your maps over hotel Wi-Fi before leaving, and keep a saved copy of key addresses written in the local language.
Step 8: Book Lodging and Time-Sensitive Experiences
Book lodging and fixed-ticket attractions once your schedule is stable, favoring refundable rates until your flights are confirmed. Location matters more than room size for most independent travelers, since a central base saves hours of transit over a trip.
Check these points before you pay:
- Distance to the transit station or main sights you will use daily
- Cancellation terms and the deadline for free changes
- Whether check-in times match your arrival
- Reviews from the past few months, not just the overall score
For destinations where hotel selection is a significant part of the experience, a specialist can help. A service such as Rome Key Co. books Italy's well-known properties with added perks, which may suit travelers building a trip around that country. Once everything is booked, paste each confirmation, address, and phone number into your master document.
Step 9: Sort Health, Insurance, and Documents
Handle health preparations and paperwork at least a month ahead, since some vaccines and medications need lead time. The CDC advises travelers to visit a doctor at least a month before a trip to get any needed vaccines or medicines, and says all international travelers should be fully vaccinated against measles with the MMR vaccine. You can also review destination-specific Travel Health Notices for outbreaks and other health risks.
Consider travel insurance as part of the same step. A 2026 survey of more than 2,000 U.S. adults found that half had purchased travel insurance, and 41% of buyers cited avoiding financial loss from cancellation as a reason. Timing matters as well: a 2025 Amadeus survey of 3,000 travelers found 43% arranged protection during booking, while 29% did so a few weeks before the trip.
Complete this document checklist:
- Passport validity and any entry requirements for your destination
- Copies of passport, insurance, and bookings stored offline and in the cloud
- Notification to your bank of your travel dates
- A copy of your itinerary, contact details, credit cards, and passport left with someone at home, as the CDC recommends
Our Pre-Trip Checklist covers these tasks in one place if you would rather not assemble the list yourself.
Step 10: Make the Itinerary Usable on the Road
Convert your plan into a format you can read quickly on a phone, with links to every booking and address one tap away. A finished itinerary that lives in six email threads will fail you at the moment you need it.
Build a single document with this structure for each day: date, base, planned stops in order, confirmation numbers, opening hours, and a backup option for bad weather. Keep a one-page summary at the top listing flights, lodging addresses, and emergency numbers.
Digital formats make this easier because they update and search better than paper. Awesome Travel Guides are built to be scanned quickly on phones, tablets, and laptops, with clickable links and screen-first layouts, and each guide includes free updates for one year after purchase. For more on why that approach works, see our piece on why digital travel guides are the future of travel planning.
Finally, pack with the plan in view. A packing guide written around your itinerary prevents the common mistake of bringing gear for activities you never scheduled.
Common Mistakes and How to Fix Them
Most itinerary problems come from a few common errors, and each has a simple correction.
Overpacking the schedule. Seven stops in a day leaves no room to enjoy any of them. Cut each day to one major sight plus two or three minor ones, and treat anything beyond that as a bonus.
Ignoring travel time. Listing distances without counting transfers, ticket lines, and waiting makes every day run late. Add a thirty-minute cushion to each transit leg when drafting.
Booking everything too early. Locking nonrefundable rates before flights are confirmed creates expensive problems if plans change. Prefer free-cancellation options until your anchor dates are firm.
Skipping the buffer day. A single cancelled train or a bad weather day can unravel a rigid plan. Keep at least one flexible half-day per week of travel.
Relying on one source for recommendations. Sponsored listings and crowded review sites push everyone toward the same restaurants and viewpoints. Cross-check against independent, researched sources so you find authentic local spots.
Forgetting offline access. A plan that depends on mobile data stops working in a rural valley or an underground station. Download maps, save PDFs, and screenshot reservations before you leave.
If you reach the middle of your trip and the plan feels wrong, adjust it. A good travel plan is a framework you revise, and the clustered structure you built makes swapping a day or dropping a stop painless.
Open your notes app tonight and write the three-sentence purpose statement from Step 1, then pin your top ten sights on a map to see how they cluster. If you would rather start from researched, independent recommendations than a blank page, Shop Guides from Awesome Travel Guides to find a country guide with scannable layouts, hidden gems, and a year of free updates, and learn more about Awesome Travel Guides.